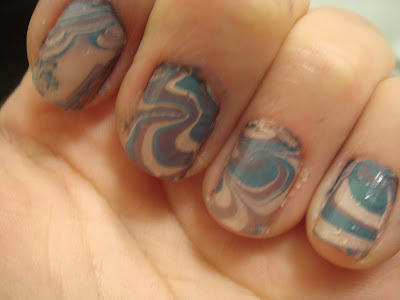
Mind you I never thought it was going to be easy, but I get these insane ideas that I can do anything. This type of mentality maybe good for things, water marble nails not so much.
I spent a few hours trying to get it down. I did one full set of nails and they came out pretty well except for a few nails. I tried to redo them, but I lost my patience with it and gave it. The frustration was just to much that I grabbed the nail polish remover and wiped away all of it. Honestly, it was very foolish of me I spent several hours on those nails and quite a lot of nail polish and it was all for nothing.
After several minutes I decided to give it another go and the results were slightly better.
Results of Attempt 1:
Results of Attempt 2:
Now, I am no expert when it comes to water marble nails, so I highly suggest you look up some different tutorials and articles on it. But I will give you a few tips that I found out and the pros and cons of doing this technique.
Items that you will need:
1. A two or more nail polishes each different color.
2. A cup or very small bowl that you don't mind getting it dirty. A plastic or paper cut works.
3. Water
4. Several toothpicks
5. Chap Stick or one of the items that I list below.
6. Lots of napkins
7. Nail polish remover
8. Q-tips
9. Cotton pads or Cotton balls
Tips:
1. It is better to use filtered water.
2. Use luke warm water, something about cold water and the nail polish just don't mix well.
3. To make sure that nail polish doesn't get all over your fingers cover them in one of the following:
- Chap Stick
- Cuticles Oil
- Baby Oil
- Vaseline
- Regular tape (I'm too scared to use this one)
5. Do it with I friend, so if you do mess up that at least you have someone there to make a joke about it and make light of the situation. It would have been nice to have someone else saying all those offensive words instead of me.
Pro:
1. It looks amazing! Very different from the usual nail art you see around.
2. Although it was a pain to deal with all the step, it was also incredibly fun.
3. It is somewhat rewarding.
Cons.
1. It is very messy.
2. You use up a lot of nail polish, especially if it is your first time trying it.
3. It is very messy.
4. Is incredibly frustrating, you must have a lot of patience to do try this out.
5. You never seem to get the design that you want as much as you try.


I think you're being to hard on yourself, they didnt come out that bad!
ReplyDeleteIt wasn't perfect! I'm going to keep trying though :)
ReplyDeleteI've tried it and it just doesn't work on me! Are there certain polish brands that you have to use?
ReplyDeleteChina Glaze and Sally Hansen Xtreme Wear worked the best for me. Also, remember not to drop the nail polish too far from the water or it will go straight to the bottom.
ReplyDelete